How to Control LED Lighting with DMX
Although DMX Control was originally created for stage shows it can also be used in a variety of other applications where an LED user wants complete control over there LED Lighting. In this tutorial you will learn all the components you will need as well as proper installation techniques to start making your LED Lights do exactly what you want them to do through DMX Control.
1.) Understanding the Basics of DMX Control
"DMX" stands for "Digital Multiplex Signal". It is sometimes called DMX 512, because it can be used to control up to 512 channels. To better understand the word channel, think of a DMX "Channel" as a "Color", so if you have an RGB light this light would use 3 "Channels" or "Colors". You can control up to 170 RGB Lights in a single DMX universe or up to 512 single color lights in one DMX universe. Each fixture is specifically addressed within the 512 universe using a DMX Decoder/Driver, and you program your light scenes according to the DMX address that you assigned to each fixture.
2.) Determine the Number of Fixtures or Sections you would like to Control
The number of different fixtures or groups of fixtures that you would like individual control over is important because each section is going to need a specialized DMX address through a DMX Decoder/Driver unit. It is also important to know how many channels or colors that each section is going to need in order to be controlled. For example if you would like to control a single color LED light then you will need a single channel DMX Decoder/Driver. For an RGB fixture you will need 3 channels in order to control all 3 colors, so a 3 channel DMX Decoder/Driver will be necessary. If you are using an RGBW fixture then you will need a 4 channel driver/decoder and so on.
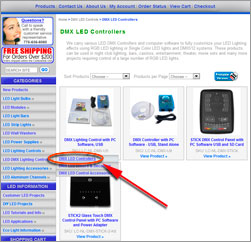
3.) Purchase a DMX Controller Accordingly
It is important to figure out the number of fixtures that you would like to control as well as the total number of DMX Channels you will be using before purchasing a DMX Controller as some controllers are limited in the amount of DMX Channels they can control as well as their memory capacity. Our U6 DMX Controller can control up to 60 DMX Channels with limited memory, while our Stick Controller can control 2 full DMX Universes (1024 Channels) with unlimited memory. This is why it is important to know what you want to do with your lights and how many DMX Channels you will be using before you purchase a DMX Controller.
4.) Determine the Wattage of each Fixture or Section you would like to Control
The total wattage of each fixture or section that you are going to want to individually control is important because each DMX Decoder has a certain amount of wattage that it can handle before over-driving. If you have lights that exceed the maximum wattage of the decoder/driver, a signal amplifier must be incorporated for the remainder of the load.
5.) Purchase the appropriate DMX Decoder/Driver
Once you have determined the total wattage of each section that you would like to control you can then purchase a DMX Decoder/Driver for each. If you are using RGB lights you must be certain to purchase a 3 channel decoder/driver. If you are using single color lights it is best if you use a single channel decoder/driver. If you are using an RGBW light then a 4 channel decoder/driver would be the one to use. Keep in mind the maximum wattage of the decoder/driver and incorporate a signal amplifier if necessary. Also be aware that most of our decoders are connected in a daisy chain. If this is not possible a DMX splitter or wireless DMX transmitter will be required.

6.) Hook up your DMX Control System for Programming
Hooking up your DMX Control System for programming is a fairly straight forward process depending on the size of the installation. First of all you must determine the DMX addresses that you would like to set your DMX Decoders to. It is best practice to start with your first driver/decoder and give it the lowest address in your system, such as 1. If you are using RGB Lights then your next decoder address would be 4-6, since 1-3 is being taken up by the first decoder. If you are using single color lights then your next decoder in the daisy chain would be set to address 2. There are 3 different ways to configure multiple decoders, the first being a daisy chain, the second using a DMX Splitter and the third using a DMX Wireless Transmitter and receiver (See photos below). Once you have everything wired together you can bring low voltage DC power to your decoders as well as turn on your DMX Controller by a 5V USB connection.
Example of Daisy-Chained DMX Decoder Installation
Example of DMX Decoder Installation using DMX Splitter
Example of DMX Decoder Installation using Wireless Transmitter
7.) Program your Lighting Scenes
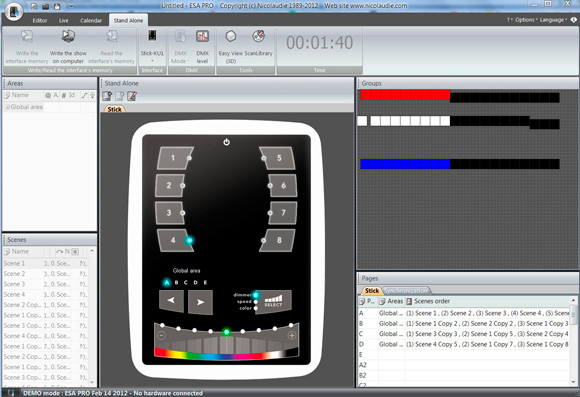
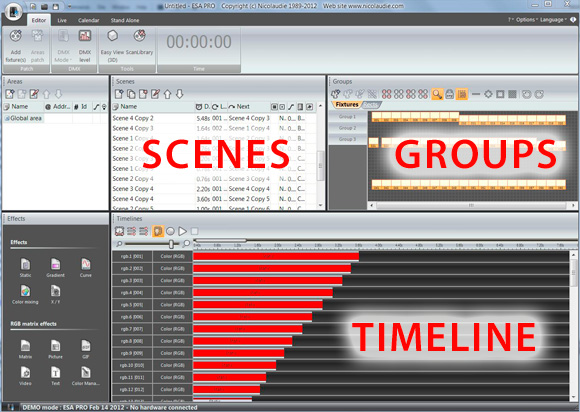
Once you have powered all of your components you can now load the DMX Software included with the DMX Controller. If everything is wired correctly you will be able to adjust your lights and start to program scenes in live time, seeing changes in your lighting as you make them. You can also program your scenes without being hooked up to any lights but I find it easier to do so when the lights are powered and live. Each controller has the ability to store a given amount of scenes. You can make a scene do basically anything you want, and you can group your fixtures and name them to make your programming easier. We do not offer tech support on the computer software and recommend practicing with it anywhere from a day to a week in order to feel comfortable creating your lighting scenes.
8.) Save your Scenes and Operate In "Stand Alone" Mode
After you have created a scene or scenes that you are happy with you can now write the scenes to the memory on your DMX Controller and operate the scenes without being hooked up to the computer or what we call "Stand Alone" Mode. What is great about most DMX Controllers is the ability to create multiple scenes and the ability to have triggers to make the scenes play. Once you are in stand alone mode be certain that you are using the correct power supply for your DMX Control Unit. Once you have written the memory you can plug in your DMX controller in stand alone mode and shuffle through your scenes that you have saved.