1.) Locate Included Software Disc
Each of our DMX Controllers includes a disc containing a variety of different software, specific for each controller. For these two DMX Controllers you will be using the ESA or Easy Stand Alone software. Start by inserting the disc into your computer.
2.) Open Folder to View Files
Once you have inserted your disk you should get an automatic pop-up screen prompting you to Download the Sunlite Suite 2012 software, DO NOT DOWNLOAD THIS SOFTWARE UNLESS YOU ARE AN ADVANCED DMX PROGRAMMER, IT IS VERY COMPLEX. Instead navigate away from the Sunlite Suite Software and 'Open Folder to View Files.' From there we will navigate to the proper folder to install the ESA software. If you do not get an automatic pop up, manually navigate to your CD-ROM Drive using 'My Computer.'
3.) Navigate to the 'slesa' Folder
Once you have opened the contents of the included CD, you can now navigate to the folder named 'slesa'. Double Click on the folder icon to open its contents.
4.) Double Click the 'EasyStandAlone' Icon and Follow the Installation Instructions
Inside the 'slesa' folder you will find the EasyStandAlone application icon to download the Easy Stand Alone Software. Double click this icon and follow all of the installation steps.BE CERTAIN TO DOWNLOAD ALL NECESSARY DRIVERS WHEN PROMPTED!
5.) Install the ESA Software and Start the Program
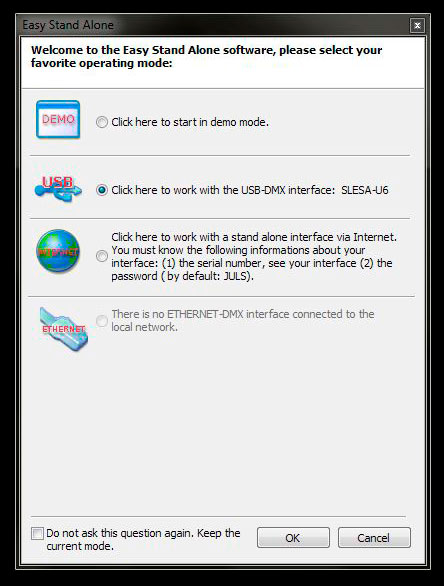
After properly installing the ESA Software you can now open the program. On start up you will see a screen similar to the picture on the right (click to enlarge) giving you 4 options, the top two are the only ones relevant to this product. You can either start the program in 'Demo Mode' (no controller hooked up to computer) or with the attached USB interface as seen in the picture to the right. When you have your DMX controller hooked up to the computer and proper components attached you can see your lighting scenes in live time.
Using the Software
1.) Setting up Your DMX Fixtures
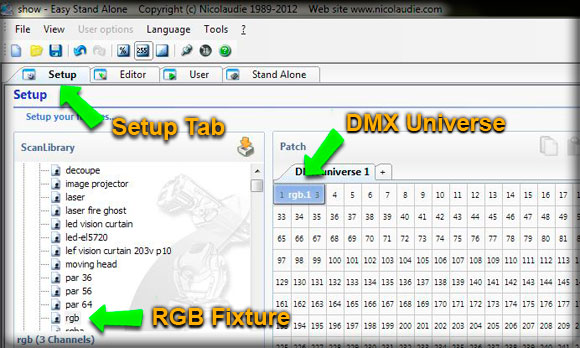
After your ESA software has booted you will see the Setup Screen. This is where we will set up our DMX fixtures to make the programming of your lighting scenes less complicated. If you expand the 'Generic' folder of your 'Scan Library' you will see a large list of fixtures. If you are using RGB LED Lights you will want to locate the 'rgb' fixture in the scan library and then click and drag it to the appropriate address in your DMX Universe table to the right. If you are using a single color light, do the same thing but grab the 'single channel' fixture.
2.) Creating Your Lighting Scenes
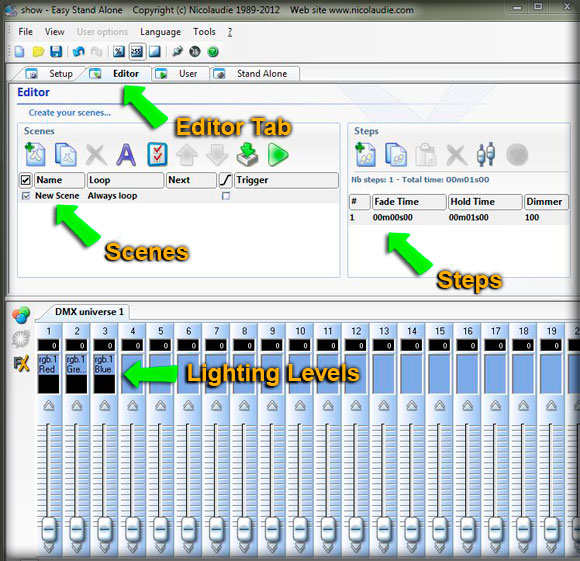
After you have setup your lighting fixtures to the appropriate DMX address you can now begin to build your lighting scenes. Start by clicking the 'Editor' tab at the top of the screen. Here you will notice two rectangle boxes labeled 'Scenes' and 'Steps' as well as a long list of sliders to set lighting levels.
Scenes: There are a variety of options for your scenes including 'Loop', 'Next', 'Fade', and 'Trigger'. Loop gives the option of how many times you would like to play the given scene, next allows for specified scenes to play after the loop, fade allows for fading between scene changes, and trigger is a special option using relay triggers to initiate a scene. Keep in mind that next is not an option when loop is set to 'always loop'.
Steps: Steps are the components that create your scenes. The options for your steps are 'Fade Time', 'Hold Time', and 'Dimmer'. Fade time is the time that your lights will take to fade to the color or brightness level of your next step, hold time is the amount of time that the current step will hold or stay on, and dimmer is the brightness adjustment based on a %100 scale.
Lighting Levels: You will notice a long line of sliders at the bottom of your page. This is the area that you will set your lighting levels for your steps. Once you have selected the step you would like to adjust you can now set the sliders to the level you would like. You can adjust by clicking and dragging the slider itself or double clicking the number under the DMX address. Light levels are set to 0-255 by default, you can change this to a 0-100% percentage option by clicking the view tab at the top of the page. REMEMBER THAT YOUR LIGHTING LEVEL WILL NOT CHANGE UNLESS A STEP IS SELECTED AND HIGHLIGHTED.
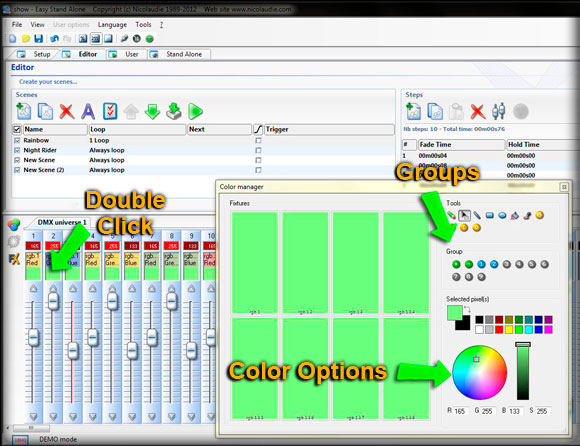
3.) Utilizing Built-in Color Manager
The color manager is a very powerful tool built into the ESA software. Initiate the color manager by double clicking the square color box above the sliders (see image for reference). Inside the color manager you will see all of your fixtures that you previously setup in step1. You can select multiple fixtures by using the tools at the top right, or by ctrl+click on multiple fixtures. Once you have selected the fixtures you want you can now place them into groups by clicking the green + button in the groups section. You can create up to 9 groups and then select each group by clicking on its number. Once your group was selected you can then change the color using the color wheel or by manually inputting the color values. BE CERTAIN THAT THE STEP YOU WANT TO ADJUST IS SELECTED BEFORE YOU OPEN THE COLOR MANAGER.

4.) Utilizing Built-in Special FX
The FX function in the ESA software is another great tool to easily give you creative lighting effects without manually building them. To open the FX option click on the FX icon to the left of the screen (see image for reference). From hear you will first have to choose the fixtures you would like to control, note multiple fixtures are required for this function. Once you have opened the FX option you can play with the 'Advanced Effect' to set static colors, 'Color Mixing' for cool chasing and fading effects, and 'Gradient Editor' for smooth gradient effects. Once you have found the effect that you like and set the parameters you can then click the blue gear icon (see image for reference) to create the steps that make up the color effect.
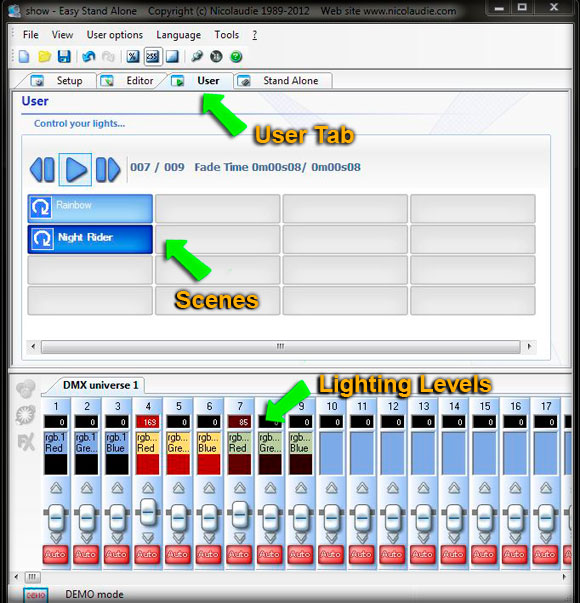
5.) Viewing Your Scenes
To view your lighting scenes in live time you can switch to the 'User' tab at the top of the screen. From here you can click on any of your scenes and they will begin to play in live time.
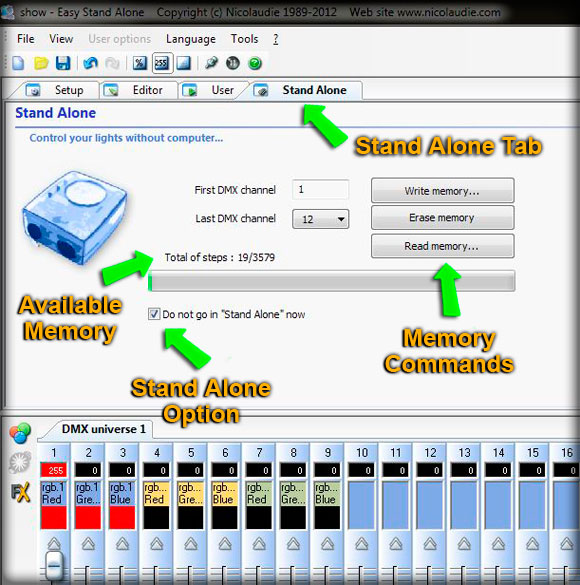
6.) Saving Your Scenes
After you are happy with the scenes that you have created you can now save them to your DMX controller for use away from the computer. First click the 'Stand Alone' tab, here you will see a variety of options. You can see the amount of memory used during your scenes, keep in mind that the 128 Channel DMX Controller has limited memory so this is important for this model. There is an option to 'Do not go in "Stand Alone" now', the only time you would un-check this box is if you are always leaving your DMX Controller hooked up to your computer as a power source. The last three options are 'Write Memory', 'Erase Memory', and 'Read Memory', these all should be pretty self explanatory. To save your scene click 'Write Memory' and follow the steps until the process is completed.
7.) Operating in Stand Alone Mode: LC-NL-DMX-U6
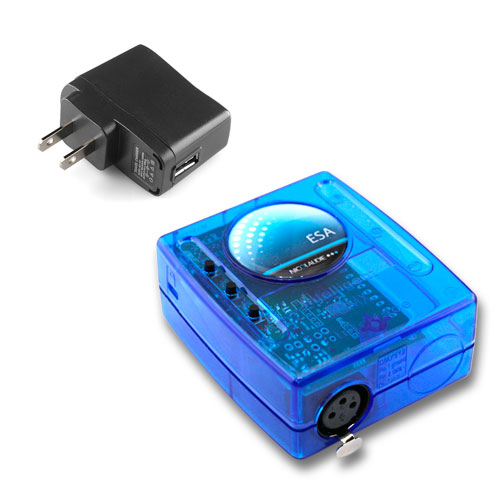
After successfully saving your lighting scenes to your DMX controller you can now operate the unit in Stand Alone Mode, or away from the computer. The LC-NL-DMX-U6 does not include a power source so operating this unit in stand alone requires additional power supplies. We can sell you a 9V adapter that can be soldered to the PC board inside the unit but additional soldering of resistors is required. It is much easier to purchase a 5VDC USB adapter like seen in the picture to the right, or use an old cell phone charger with the same adapter. If you choose to use this option you must be certain the adapter is 5VDC and nothing other than 5VDC. Once powered in stand alone and hooked up to your DMX decoders and LED lights you can now toggle between your lighting scenes using the black buttons on the top of the unit.
8.) Operating in Stand Alone Mode: LC-NL-STICK2
After successfully saving your lighting scenes to your DMX controller you can now operate the unit in Stand Alone Mode, or away from the computer. The LC-NL-STICK2 uses an included 12VDC transformer for operation in stand alone mode. Simply connect your LED Controller to your DMX Decoders with LED Lights, plug in the 12VDC transformer and enjoy your recently programmed lighting scenes. Thanks for reading this tutorial, if you have any questions you can always call us at 775-636-6060 or ask us a question by Clicking Here.