LED Troubleshooting - Power Supply Issues
There are multiple types of LED Lighting products on the market and most of them require a low voltage Power Supply, also known as an LED Transformer or LED Driver. With that being said it is very important to understand the differences between LED products and what types of power supplies they require and also there mounting restrictions so you know that you are using compatible lights and transformers. If you are having issues with your LED Power Supply read through this tutorial to see some common troubleshooting techniques. Keep in mind that using a 24VDC power supply with a 12VDC LED Light will not make it twice as bright, and vice versa, doing so will cause damage to the LED products and is a serious fire hazard. Never use 2 power supplies on one LED Light or LED Light Controller.
Are you using the right Power Supply?
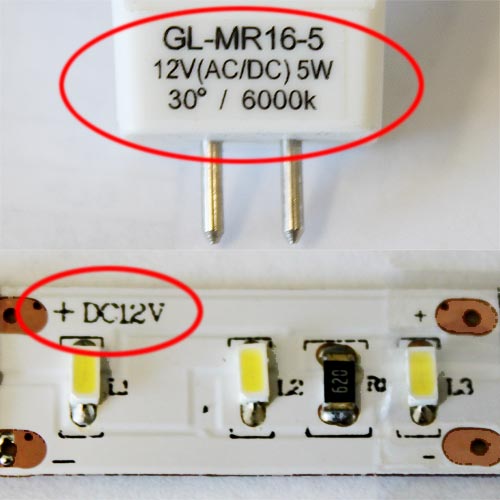
If you are having issues with your LED power supply the first place to start is to determine the voltage and power specifications of your LED Lighting Products. There are many types of LED products so it is important to know exactly what you have and one reason that we discourage people from "shopping around" for LED products because not all LED products are compatible with one another. If you do not have access to the specifications from the supplier then you can look on the product itself and usually there will be some type of marking or sticker on the product like you see in the picture to the right. If you do not know the wattage or voltage of a product you will have to purchase an instrument to read this. It is also very important to know whether your product is Constant Voltage or Constant Current LED, at Ecolocity LED we only sell Constant Voltage LED product, the two types are not compatible with one another.
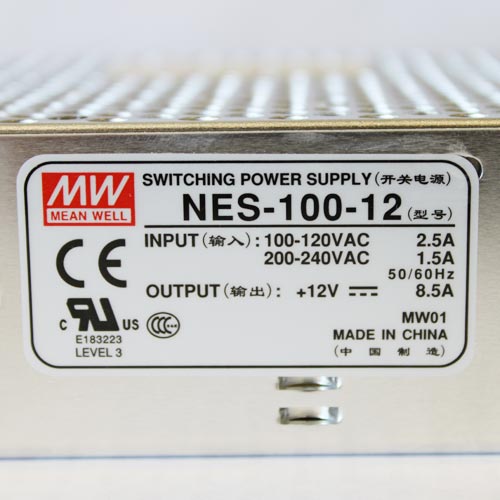
Once you have determined the specifications of your LED Lights you can now check the specifications of your LED power supply to be sure that the input and output power is suitable to the requirement of your installation. Most LED power supplies will have this information printed somewhere on the product. The picture to the right shows the AC input restrictions and the 12V DC output restrictions, if you multiply the output DC Voltage (12VDC) with the max rated amperage (8.5A) this will give you the maximum wattage load of the power supply (100W). If you are over-driving, or using more wattage on your LED Lights than the power supply is rated, this will cause your power supply to fail or flash on and off.
Are your Power Supply & Lights Installed Correctly?
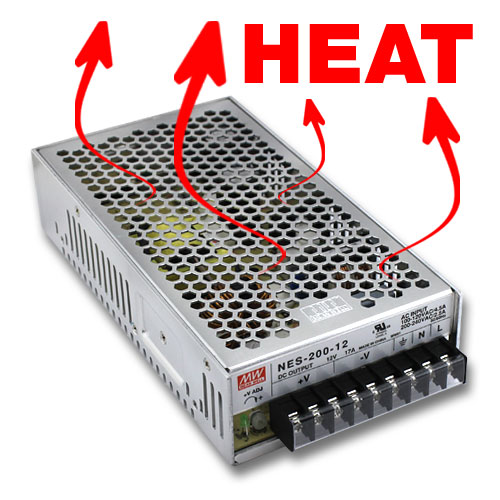
Not all power supplies can be mounted anyway that is suitable for the project. All of our power supplies have some type of installation restrictions, ignoring these will cause failure to the power supply. Our non-waterproof power supplies must be mounted face up in a well ventilated area so the heat created during use can be released. If this is ignored the power supply will surely fail over time due to overheating. Our waterproof power supplies are much more lenient as far as mounting restrictions. These can be mounted sideways, upside down, or any which way, but they are not to be mounted in direct sunlight or in a manner that they are directly exposed to outdoor elements or in standing water. If installed outdoors, these power supplies should always be put in a weather proof box.
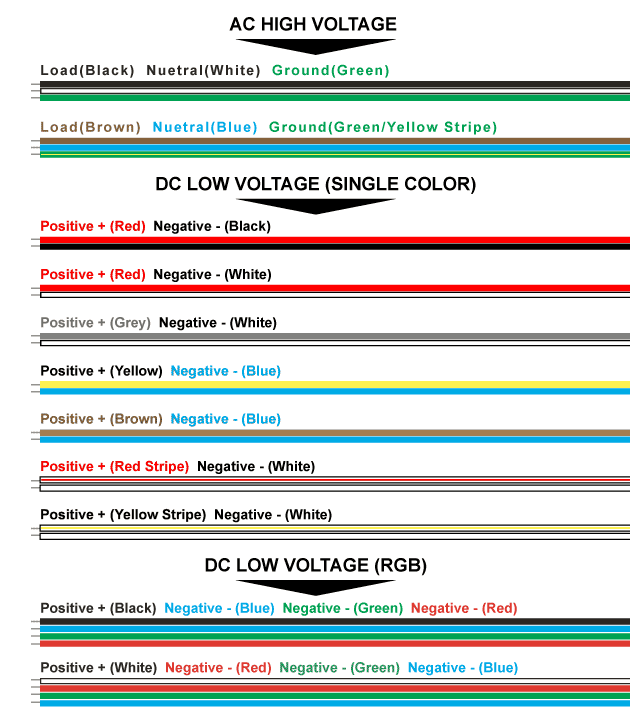
The wiring of your LED Power Supply is another important thing to double and even triple check when you are troubleshooting an issue. Even the most skilled electricians can make a simple wiring mistake now and again. Be certain that your wires are exposed and making contact with the wires or ports on your power supply. Click the image to the right to check common wire colors and be certain that you have your polarity correct. If you are not certain the polarity of your LED Power Supply use a multimeter to test.
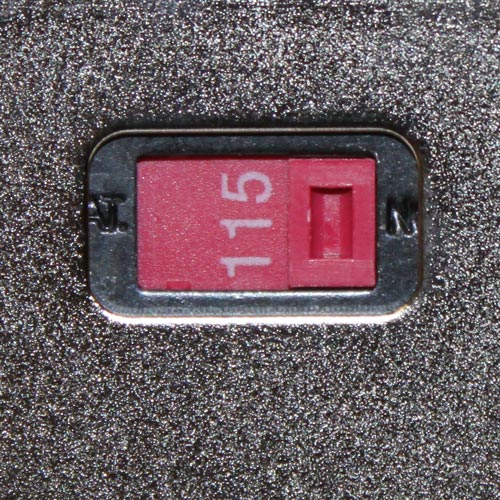
Some of our non-waterproof power supplies have an internal switch to set the input voltage between 100-120VAC or 200-240VAC, if this switch is not set correctly this will cause issues with the output of your power supply and may cause irreversible damage over an extended period of time. Be certain that this switch is in its correct position before proceeding. Keep in mind that none of our waterproof power supplies have this option.
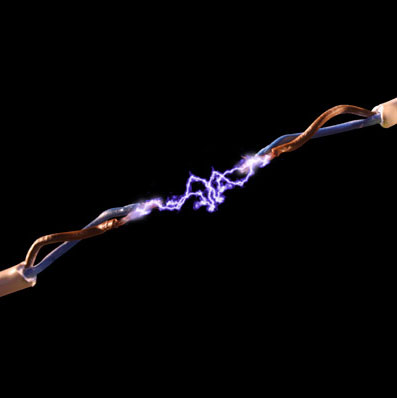
Most power supplies have built in electrical short protection, this will cause the power supply to turn on and off, almost like a blinking effect. Smoke or burnt wires are also a common sign of an electrical short. Common electrical shorts are caused by loose wires touching each other, a bridged solder joint, or installing bare copper pads (strip lights) to a metal surface.
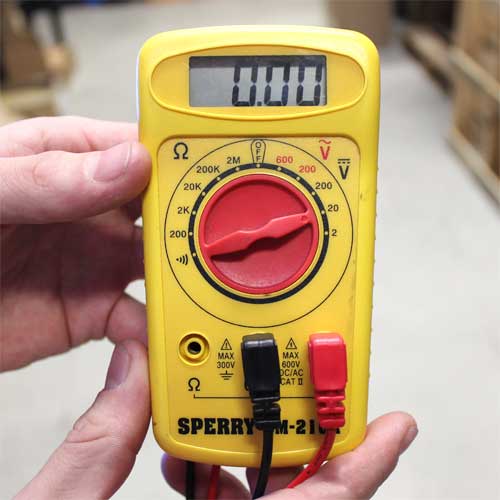
Still Having Issues, Use a Multimeter?
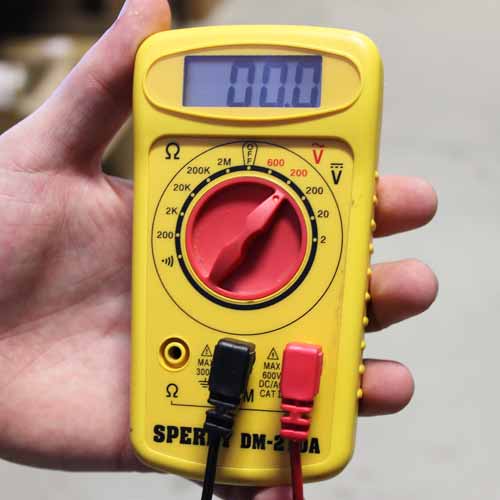
In order to test high voltage AC power you must first turn your multimeter to the proper setting on the range selector switch and put the test lead in the proper jack. On our multimeter the AC Voltage is marked in red. As you can see there is a 600 or 200 option. You want to choose an option higher than the voltage you are testing. In this case we are testing for 120VAC so we set the dial to 200. If you were testing for a voltage higher than 200VAC you would set the selector switch to 600.
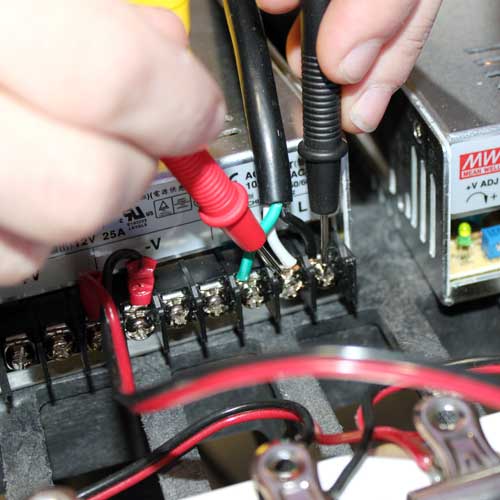
Apply the test leads to the two points at which the voltage reading is to be taken, in this case one lead on your load and one lead on the neutral, polarity does not matter (NEVER TOUCH TWO POINTS WITH ONE LEAD, ELECTRICAL SHOCK WILL OCCUR). Be careful not to touch any energized conductors with any parts of your body. Never ground yourself when taking electrical measurements. Do not touch exposed metal pipes, outlets, fixtures, etc., which might be at ground potential. Keep your body isolated from ground by using dry clothing, rubber shoes, rubber mats, or any approved insulating material. Never touch exposed wiring, connections or any live circuit conductors when attempting to take measurements. Always test your test equipment for proper operation before use.
If everything was done properly you should get a voltage reading on the digital screen of your multimeter. In this case we were testing to be sure the power supply was receiving 120VAC input, and the reading came to 118.9VAC, which is acceptable. On any voltage reading a slight variation in either direction is to be expected.

Some of our non-waterproof power supplies have an internal switch to set the input voltage between 100-120VAC or 200-240VAC, if this switch is not set correctly this will cause issues with the output of your power supply and may cause irreversible damage over an extended period of time. Be certain that this switch is in its correct position before proceeding. Keep in mind that none of our waterproof power supplies have this option.
In order to test low voltage DC power you must first turn your multimeter to the proper setting on the range selector switch and put the test lead in the proper jack. On our multimeter the DC Voltage is marked in black. As you can see there is a 200, 20, or 2 option. You want to choose an option higher than the voltage you are testing. In this case we are testing for 12VDC so we set the dial to 20. If you were testing for a voltage higher than 20 you would set the selector switch to 200.
Apply the test leads to the two points at which the voltage reading is to be taken, in this case the red lead to your positive and the black lead to the negative, reverse polarity will give you a negative reading (NEVER TOUCH TWO POINTS WITH ONE LEAD). Be careful not to touch any energized conductors with any parts of your body. Never ground yourself when taking electrical measurements. Do not touch exposed metal pipes, outlets, fixtures, etc., which might be at ground potential. Keep your body isolated from ground by using dry clothing, rubber shoes, rubber mats, or any approved insulating material. Never touch exposed wiring, connections or any live circuit conductors when attempting to take measurements. Always test your test equipment for proper operation before use.
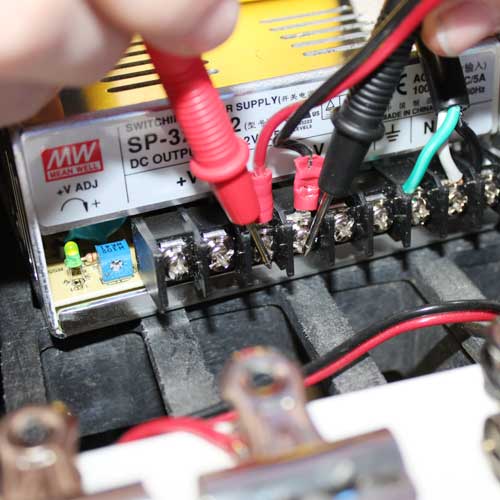
If everything was done properly you should get a voltage reading on the digital screen of your multimeter. In this case we were testing to be sure the power supply was outputting 12VDC, and the reading came to 12.12VDC, which is acceptable. On any voltage reading a slight variation in either direction is to be expected. If you reverse the polarity on your test leads the reading would have been -12.12VDC, this is a good way to test polarity if it is not marked on your LED product.
